Orchid eBound: Quick Start Guide
Walk through the initial setup of Orchid eBound, including signing in, navigating the main menu, creating a Live FFL and Bound Book, adding users with permissions, and starting your first Receive transaction. This guide assumes you have an active Orchid eBound account and login credentials.
Steps
- Navigate to the Orchid eBound login page. Open your browser and go to the Orchid eBound URL provided by your administrator (e.g., staging.fflbizhub.com for staging or the production URL for live use).
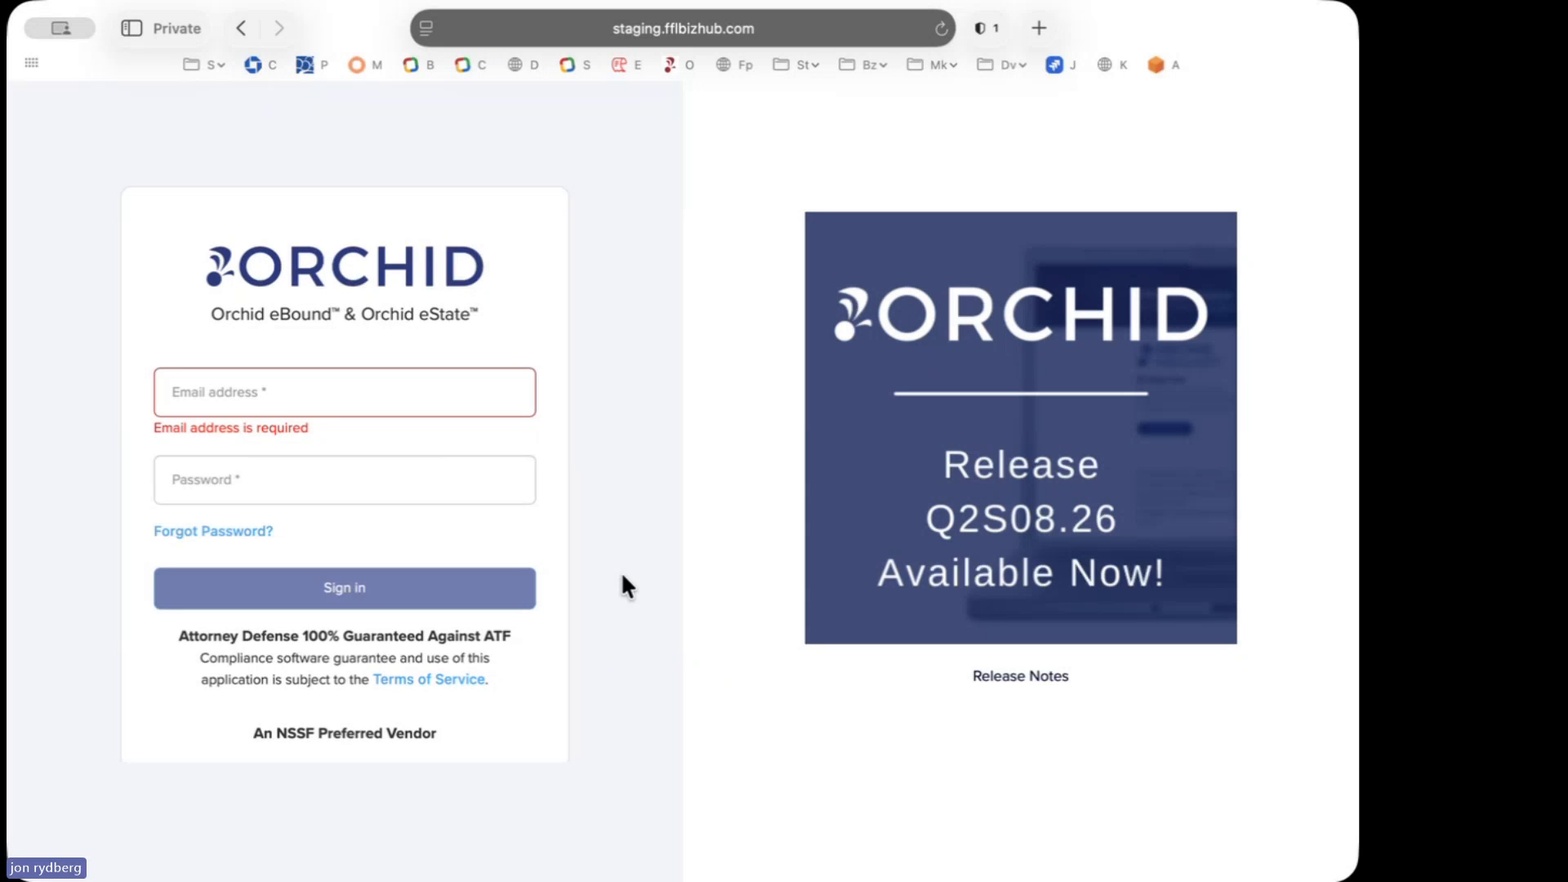
Orchid eBound login page
Orchid eBound & eState sign-in screen.
- Enter your email address. Click into the Email address field and type the email associated with your Orchid account.
- Enter your password. Click into the Password field and type your account password.
- Click Sign in. Press the Sign in button to authenticate and load your eBound dashboard.
- Review the Orchid eBound Book home screen. After signing in, the main menu loads with grouped action tiles: Operating Transactions, Retail Transactions, Special Transactions, FFL Management, Search Queries, Operating Reports, Retail Reports, Special Reports, FFL Reports, and Configuration.
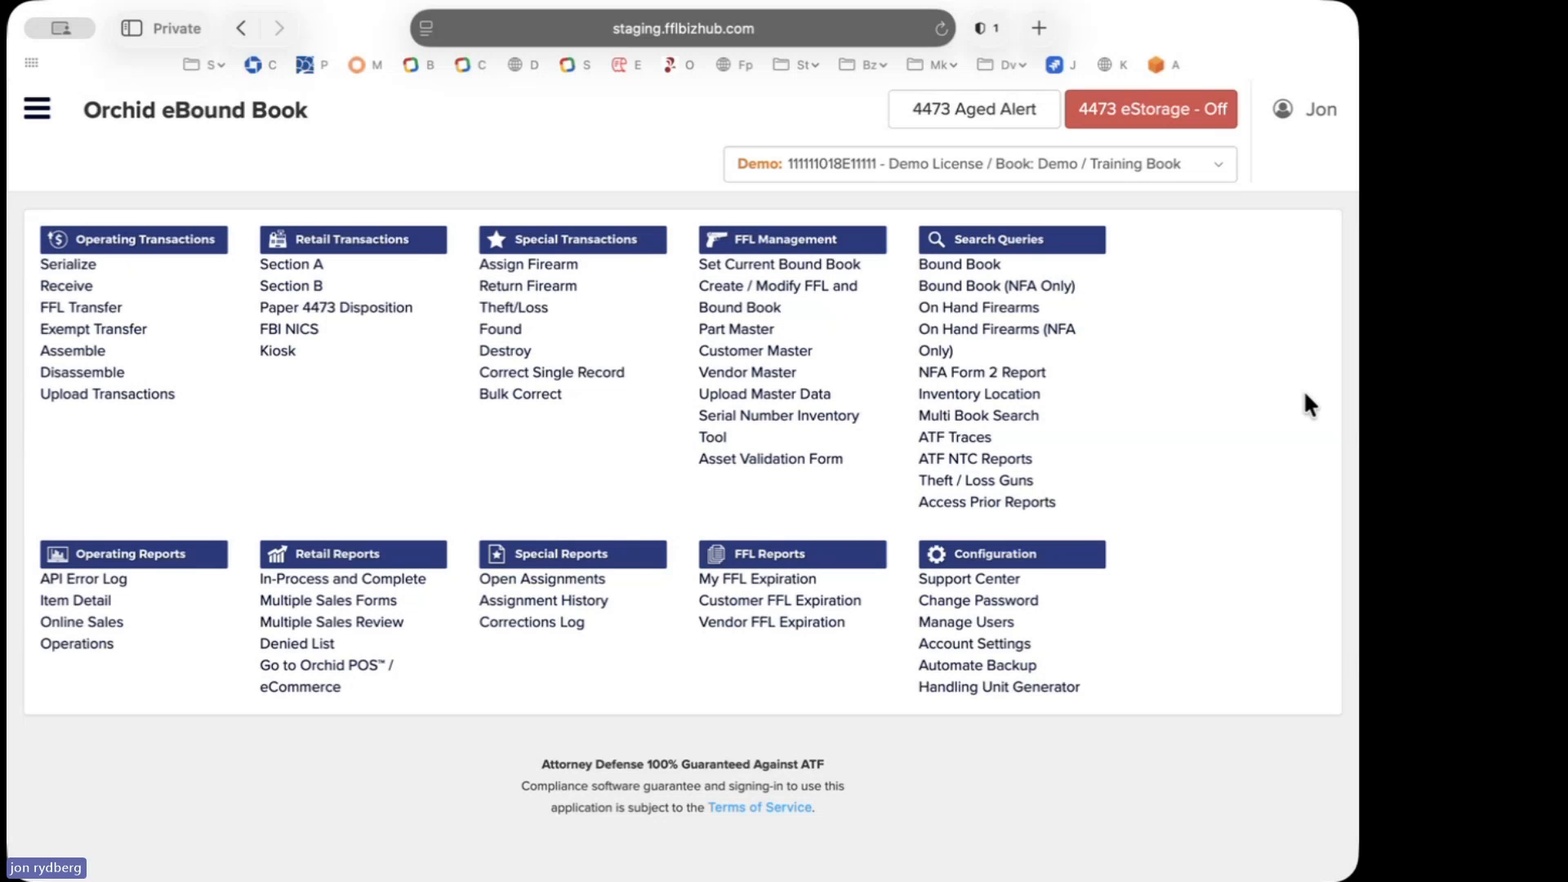
eBound Book main menu
The eBound Book home screen with all transaction and management groupings.
- Locate the Operating Transactions group. This column contains everyday A&D actions such as Serialize, Receive, FFL Transfer, Exempt Transfer, Assemble, Disassemble, and Upload Transactions.
- Locate the Retail Transactions group. This column contains customer-facing transactions including Section A, Section B, Paper 4473 Disposition, FBI NICS, and Kiosk.
- Locate the Retail Reports group. This column includes In-Process and Complete, Multiple Sales Forms, Multiple Sales Review, Denied List, and Go to Orchid POS™ / eCommerce.
- Review the Special Transactions group. This column contains Assign Firearm, Return Firearm, Theft/Loss, Found, Destroy, Correct Single Record, and Bulk Correct.
- Review the Search Queries group. This column includes Bound Book, Bound Book (NFA Only), On Hand Firearms, ATF Traces, ATF NTC Reports, Theft / Loss Guns, and Access Prior Reports.
- Review the Configuration group. This column includes Support Center, Change Password, Manage Users, Account Settings, Automate Backup, and Handling Unit Generator.
Open the side navigation menu. Click the hamburger (≡) icon in the upper-left corner of the header to expand the left-side navigation panel.
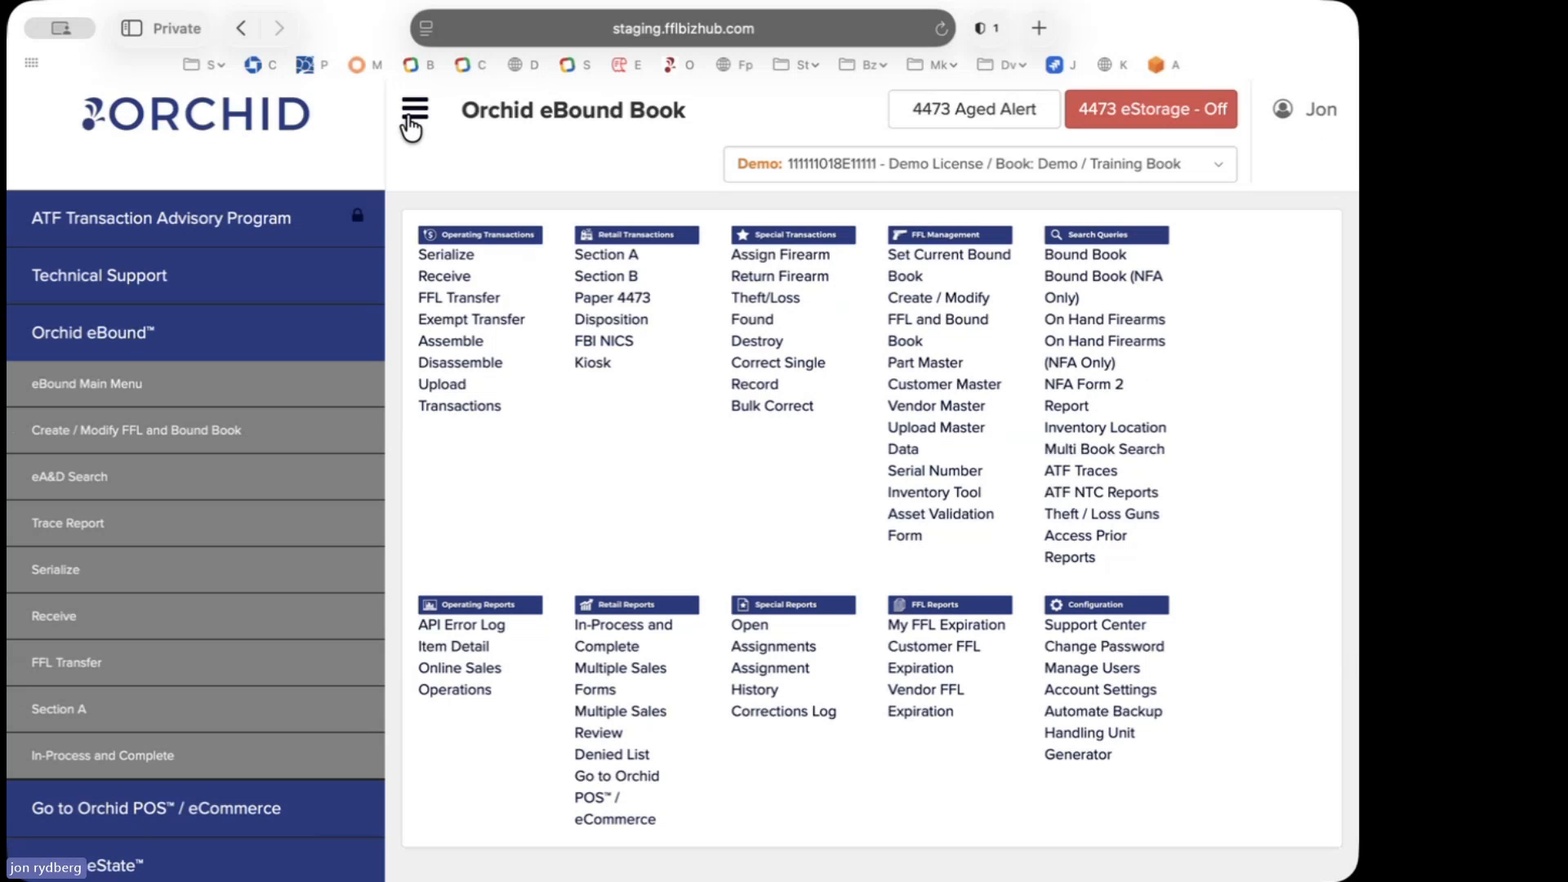
Side navigation expanded
Side navigation provides quick access to common eBound actions.
- Review the side navigation links. The expanded panel shows ATF Transaction Advisory Program, Technical Support, Orchid eBound™, eBound Main Menu, Create / Modify FFL and Bound Book, eA&D Search, Trace Report, Serialize, Receive, FFL Transfer, Section A, In-Process and Complete, and Go to Orchid POS™ / eCommerce.
- Close the side navigation. Click the hamburger (≡) icon again to collapse the panel and return to the full main menu view.
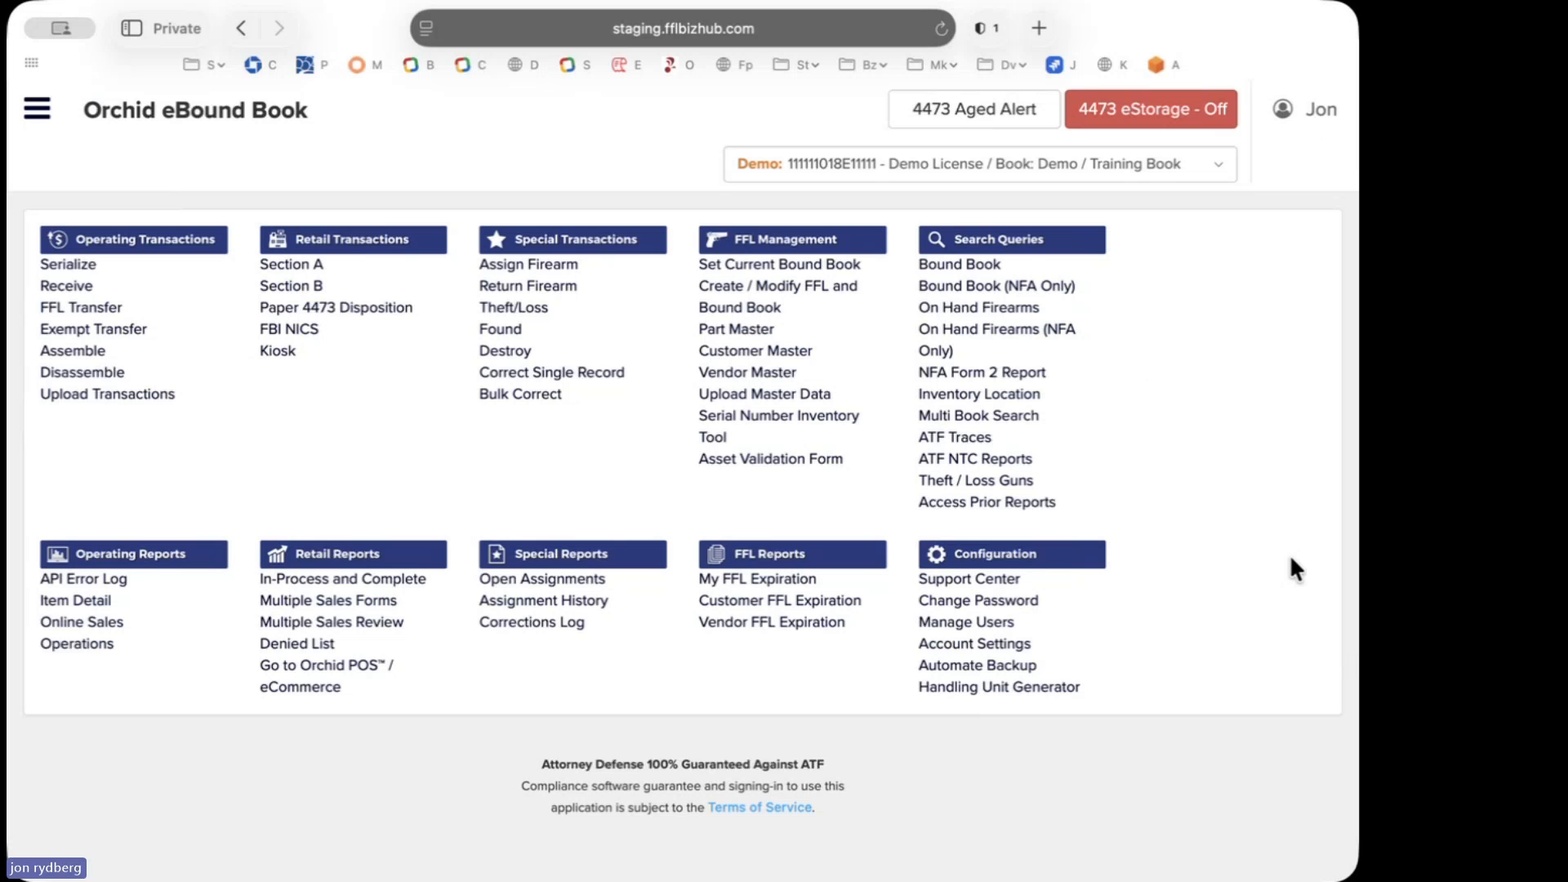
Closed side navigation
Collapse the side navigation to maximize the main menu workspace.
- Open the bound book selector. Click the dropdown at the top center of the screen displaying the current FFL/Book (e.g., Demo: 111111018E11111 - Demo License / Book: Demo / Training Book).

Bound book selector dropdown
The selector lets you switch between configured FFLs and bound books.
- Open Create / Modify FFL and Bound Book. From the FFL Management column on the main menu, click Create / Modify FFL and Bound Book to add or edit a Live FFL.

Create / Modify FFL and Bound Book loading
The Create / Modify FFL and Bound Book screen loads.
- Click Create to open the new FFL form. On the FFL list page, click the blue Create button in the upper-right to open the Create FFL and Bound Book modal.
- Enter the FFL Number. In the FFL No. (Complete, 15 Digit FFL Required.) field, type your full 15-digit FFL number (e.g., 1-11-111-01-8E-12345).
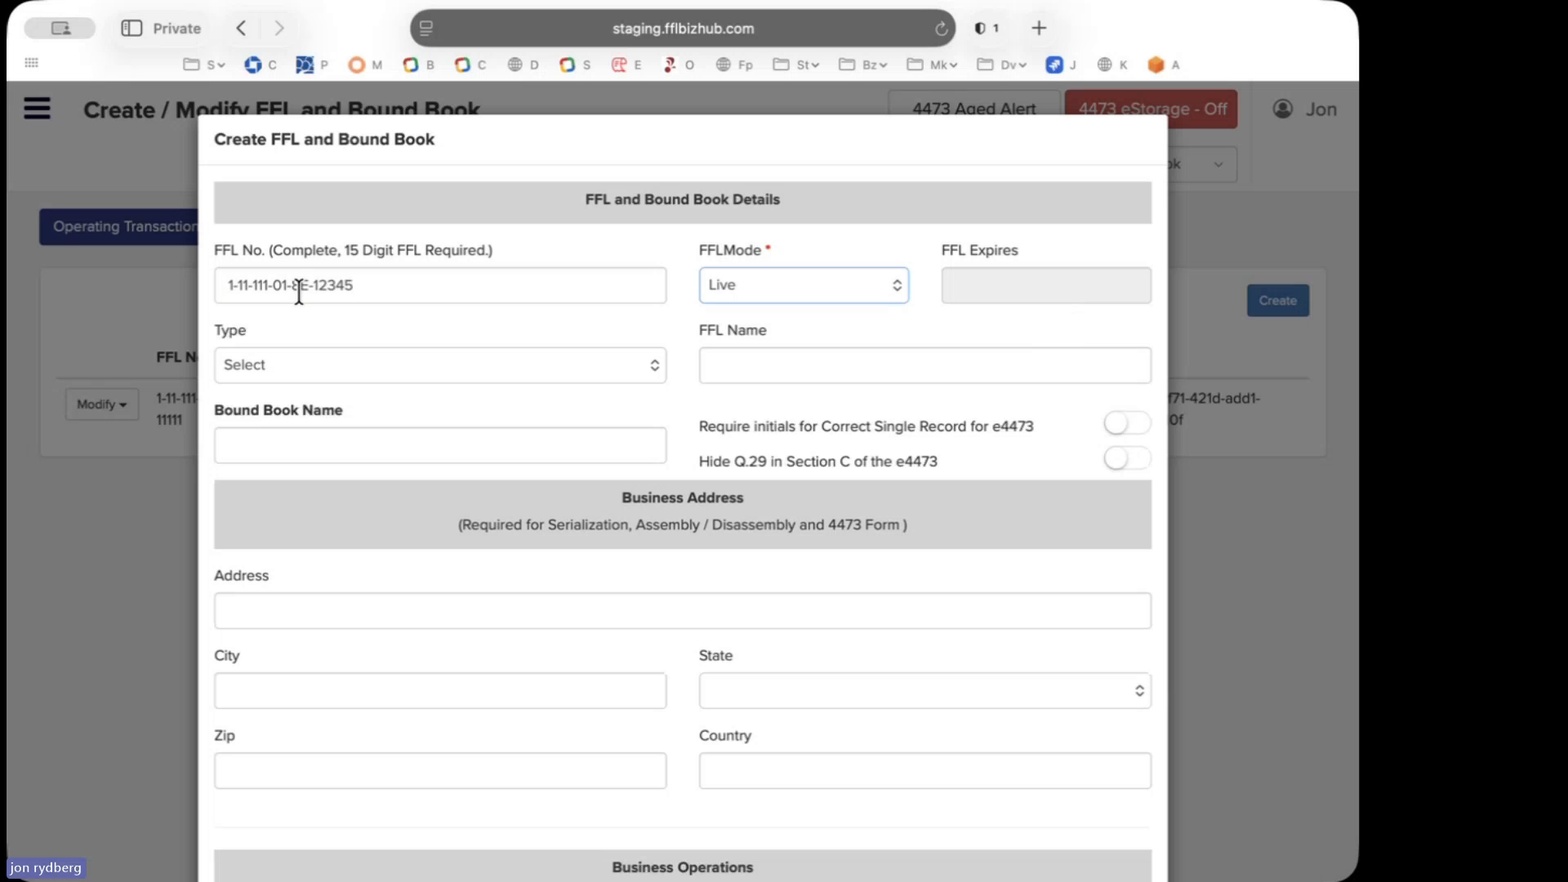
FFL and Bound Book Details form
Enter the complete 15-digit FFL number.
- Set the FFL Mode. From the FFLMode dropdown, select Live for a production FFL (or Demo for training).
- Select the FFL Type. From the Type dropdown, choose your FFL classification (e.g., Type 1).
- Enter the FFL Name. In the FFL Name field, type the licensee name as it appears on the FFL (e.g., Jon's Gun Store).
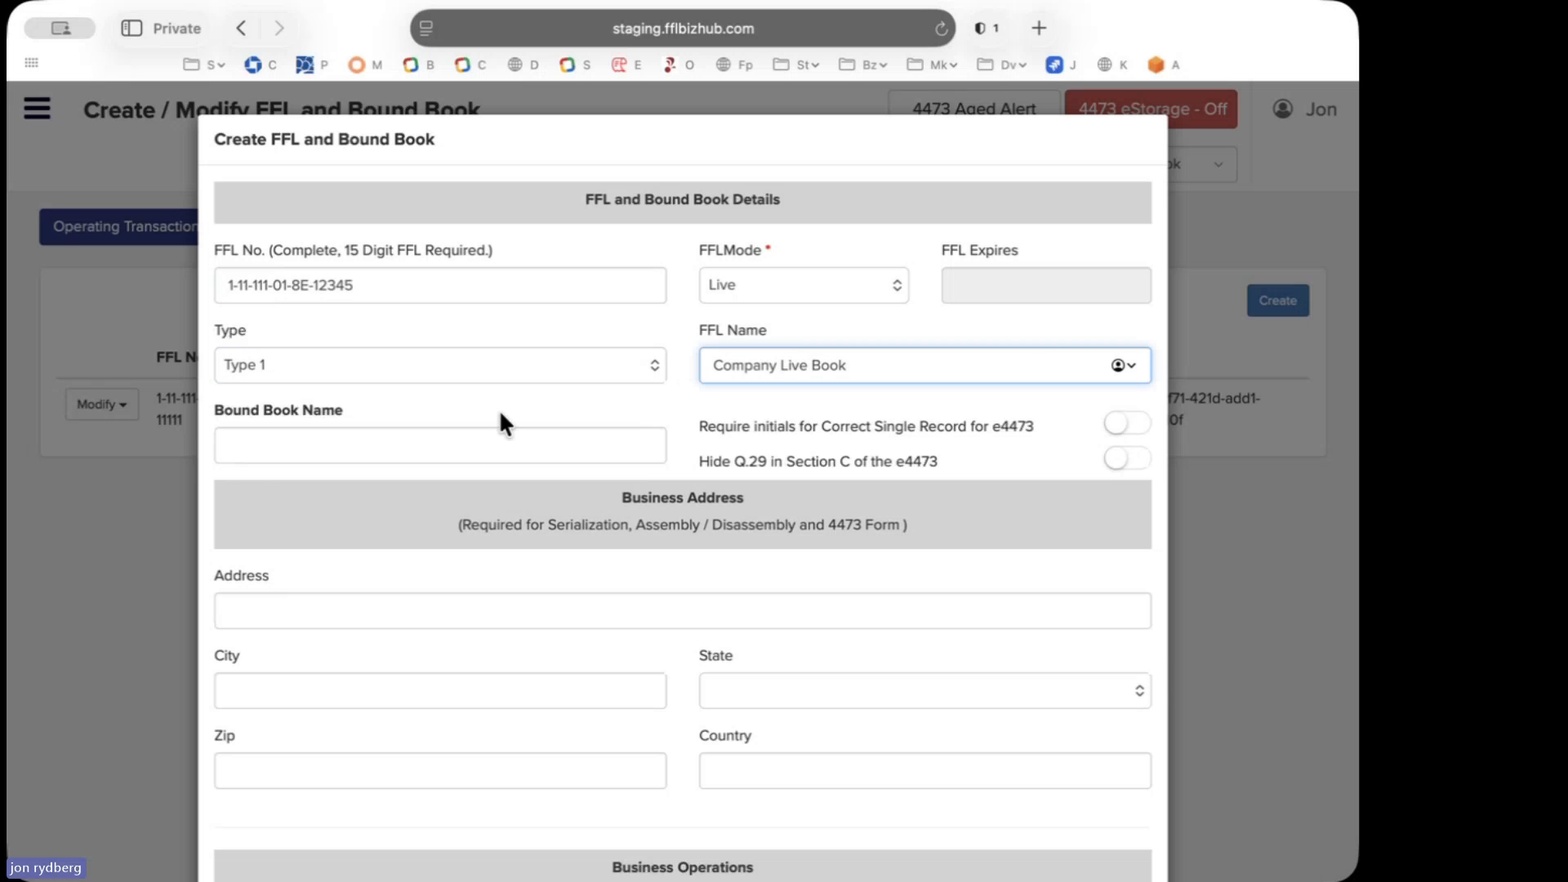
FFL Type and Name entered
Type and FFL Name identify the license in the system.
- Enter the Bound Book Name. In the Bound Book Name field, type a descriptive name (e.g., Main Bound Book).
- Optionally enable Require initials for Correct Single Record for e4473. Toggle on if your compliance workflow requires initials for single-record corrections.
- Optionally enable Hide Q.29 in Section C of the e4473. Toggle on if you do not want Q.29 displayed in Section C.
- Enter the Business Address. Type the street address into the Address field (e.g., 123 Main Street).
- Enter the City. Type the city in the City field (e.g., West Hartford).
- Select the State. Click the State dropdown and choose the correct state (e.g., Connecticut).
- Enter the Zip code. Type the postal code into the Zip field (e.g., 06107).
- Enter the Country if applicable. Type the country in the Country field.

- Complete the Business Operations section. Fill in the Agency Name, Agency Street Number & Address, Agency City, Agency County, Agency State, Agency Zip, and Email Address for Chief Local Law Enforcement as required for 4473 and Multiple Sales Forms.
- Select the Time Zone. From the Time Zone (Required) dropdown, choose your operating time zone (e.g., Eastern Standard Time (UTC -5)).
- Set Business Open days. Under Business Open (Required), check each day your business is open (Monday–Saturday in this example).
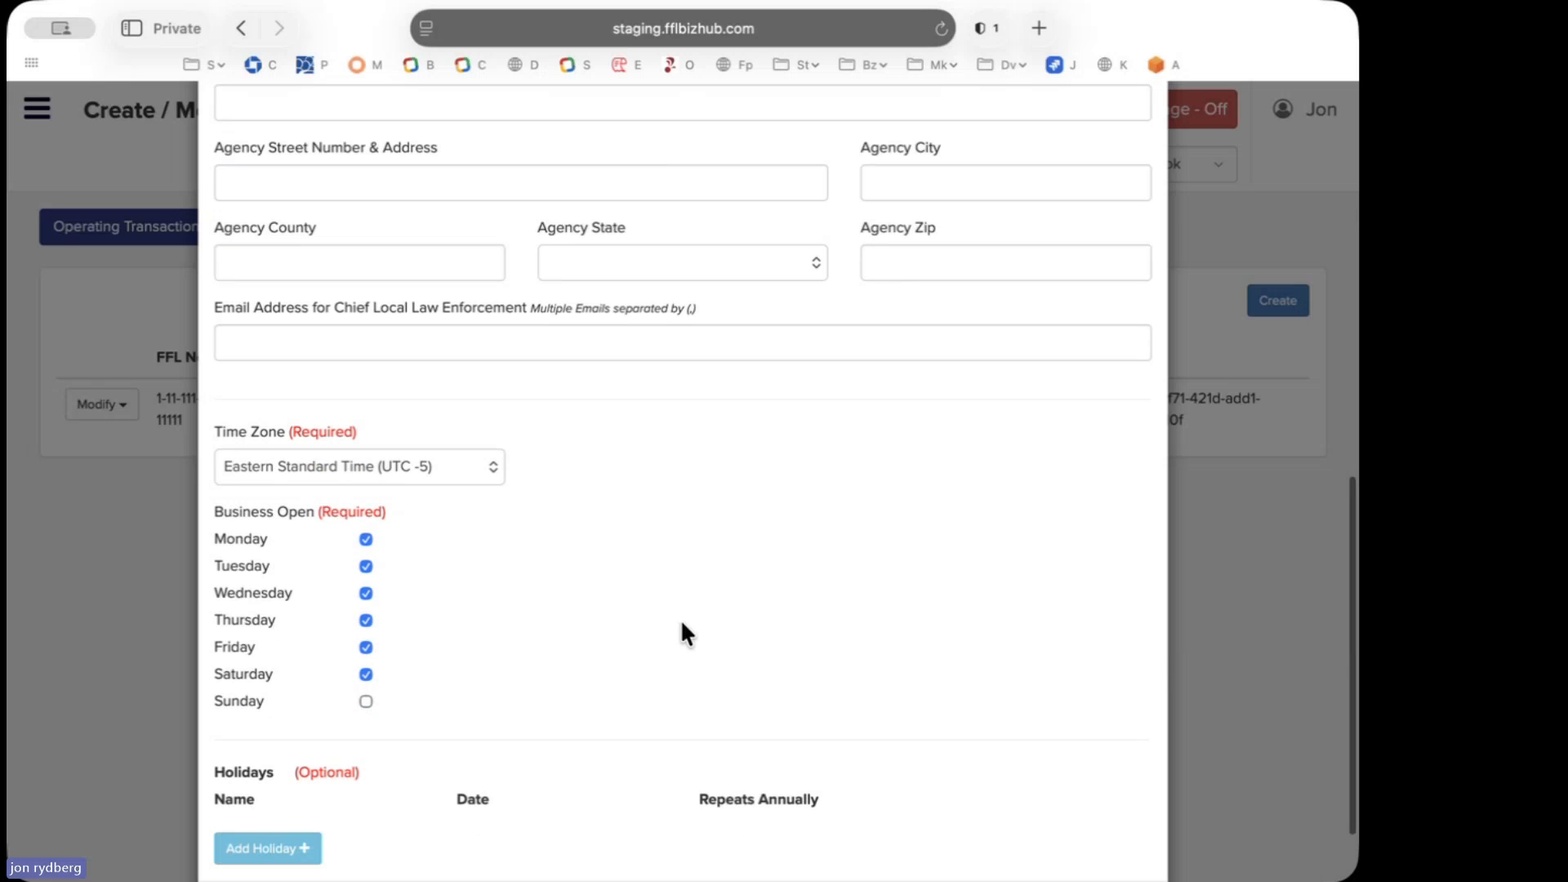
Business Open days selected
Mark every day the FFL is operating.
- Add Holidays if applicable. Under Holidays (Optional), click Add Holiday + to enter the name, date, and whether it repeats annually.
- Save the new FFL and Bound Book. Scroll to the bottom of the modal and click Save (or Create) to commit the new FFL.
- Confirm the FFL appears in the list. Back on the Create / Modify FFL and Bound Book page, verify the new Live FFL is listed alongside any existing FFLs, with FFL No., Exp, FFL Name, Bound Book Name, Address, City, State, Zip, Country, Type, Mode, and API Key columns populated.
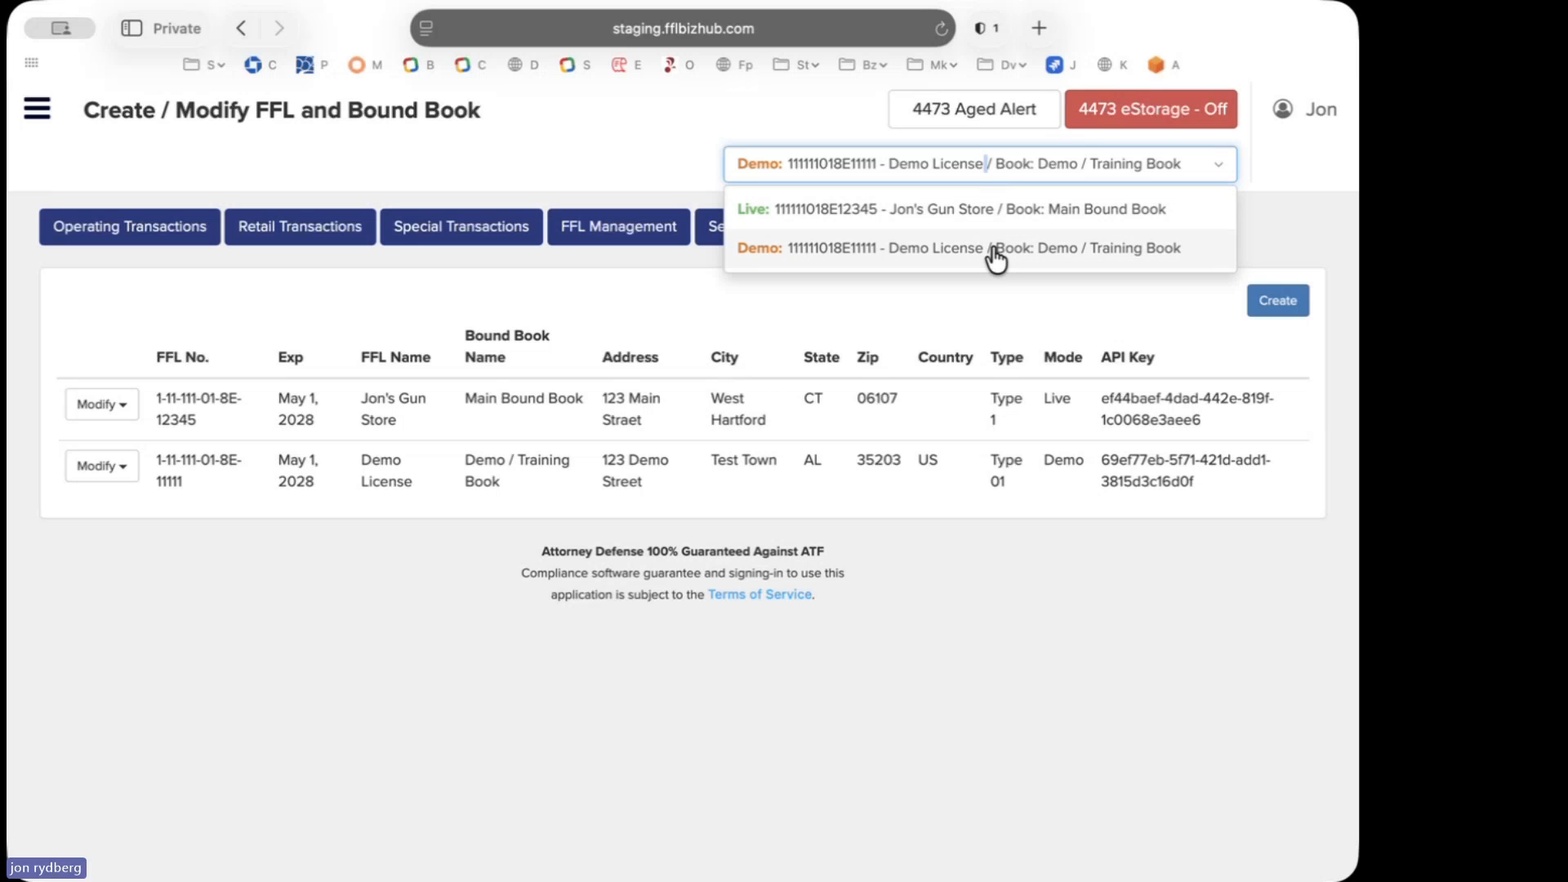
FFL list with new Live FFL
The new Live FFL appears in the list with its own API Key.
- Switch the active book to the new Live FFL. Click the bound book selector at the top of the screen and choose Live: 111111018E12345 - Jon's Gun Store / Book: Main Bound Book.
- Open Manage Users. From the Configuration column on the main menu, click Manage Users to open the Users page.
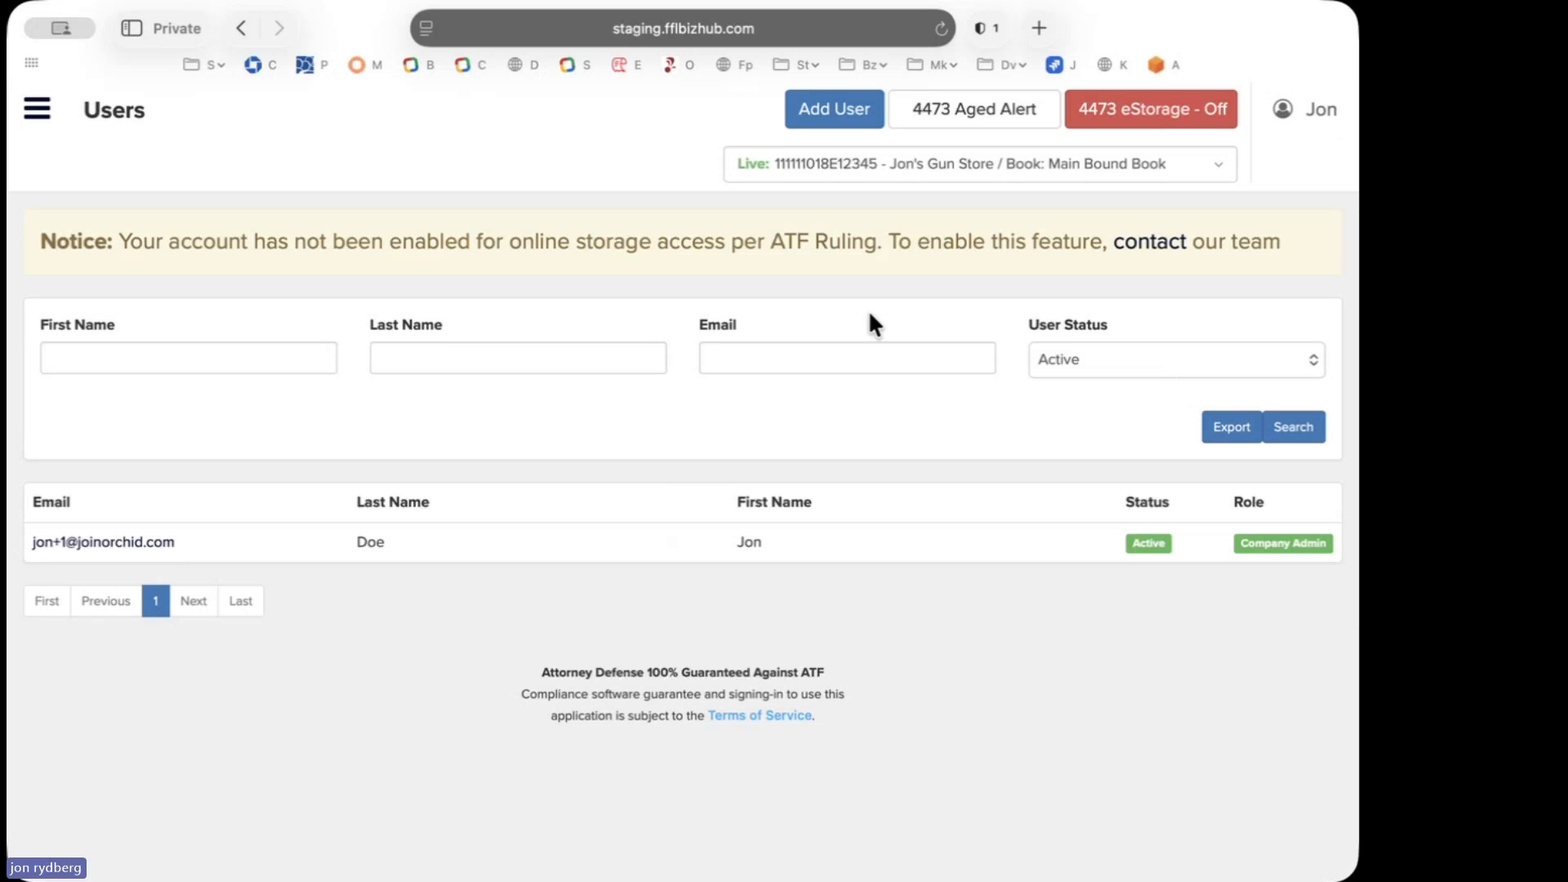
Users page
The Users page lists all current accounts on this bound book.
- Click Add User. In the upper-right of the Users page, click the blue Add User button to open the New User modal.
- Enter First Name and Last Name. On the Edit User tab, type the new user's first and last name (e.g., Jane / Doe).
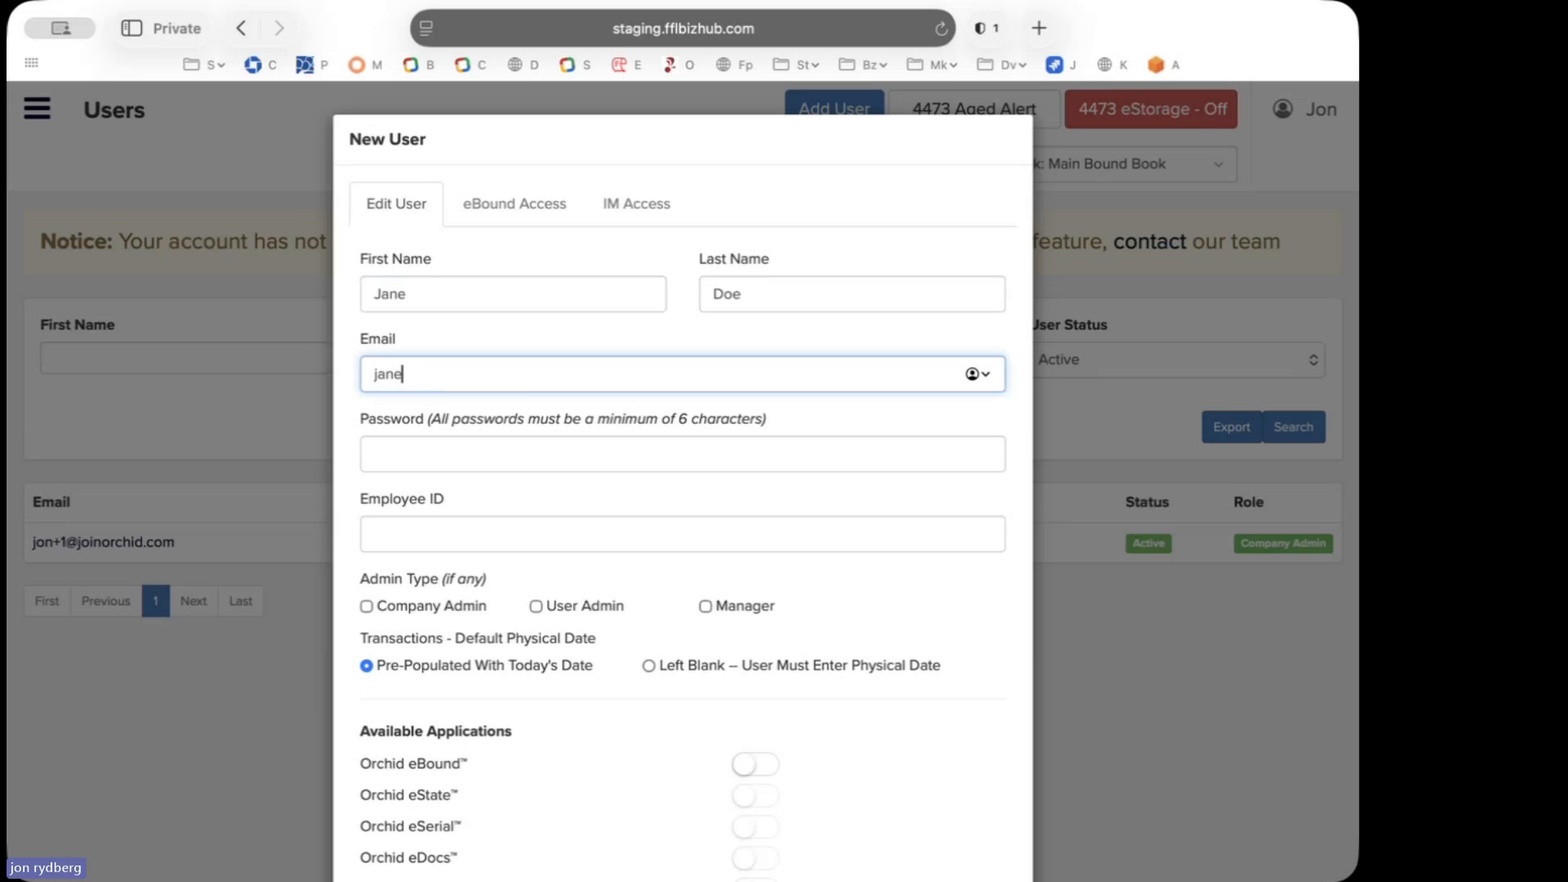
New User Edit tab
Edit User captures the user's identity and credentials.
- Enter the Email address. Type the new user's email (e.g., jane@joinorchid.com).
- Enter a Password. Type a password that is at least 6 characters long (e.g., Orchid123!).
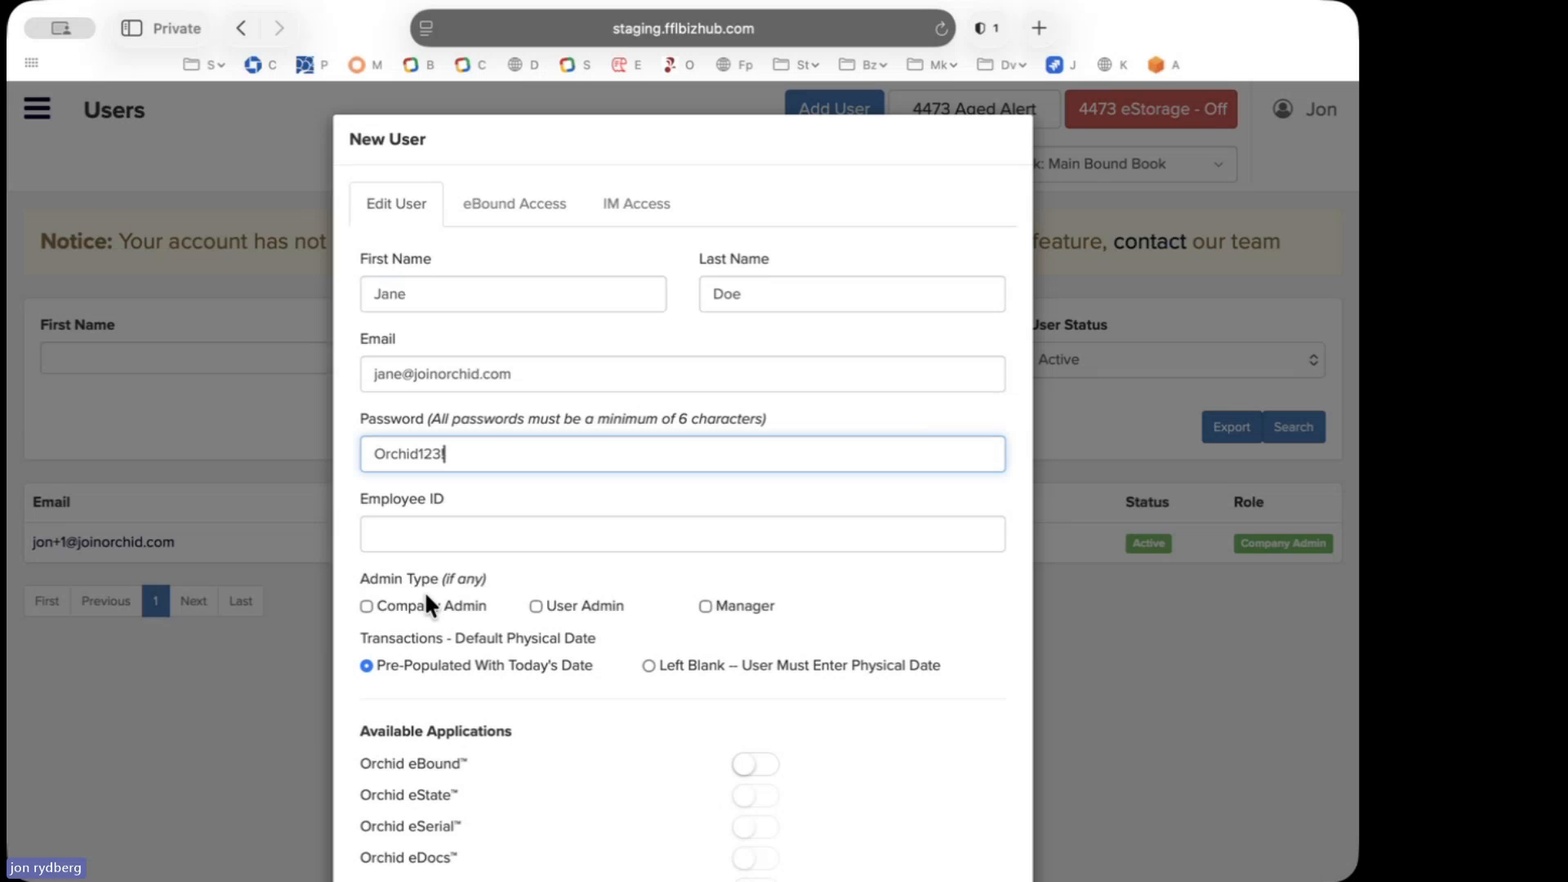
Password entered
Passwords must be a minimum of 6 characters.
- Optionally enter an Employee ID. Type the user's internal employee ID if your business tracks one.
- Select the Admin Type. Under Admin Type (if any), check Company Admin, User Admin, or Manager as appropriate.
- Choose the default Physical Date behavior. Under Transactions - Default Physical Date, select Pre-Populated With Today's Date or Left Blank -- User Must Enter Physical Date.
- Enable the Orchid eBound™ application toggle. Under Available Applications, toggle Orchid eBound™ on. Enable additional toggles (Orchid eState™, Orchid eSerial™, Orchid eDocs™, Orchid IM™) only if licensed.
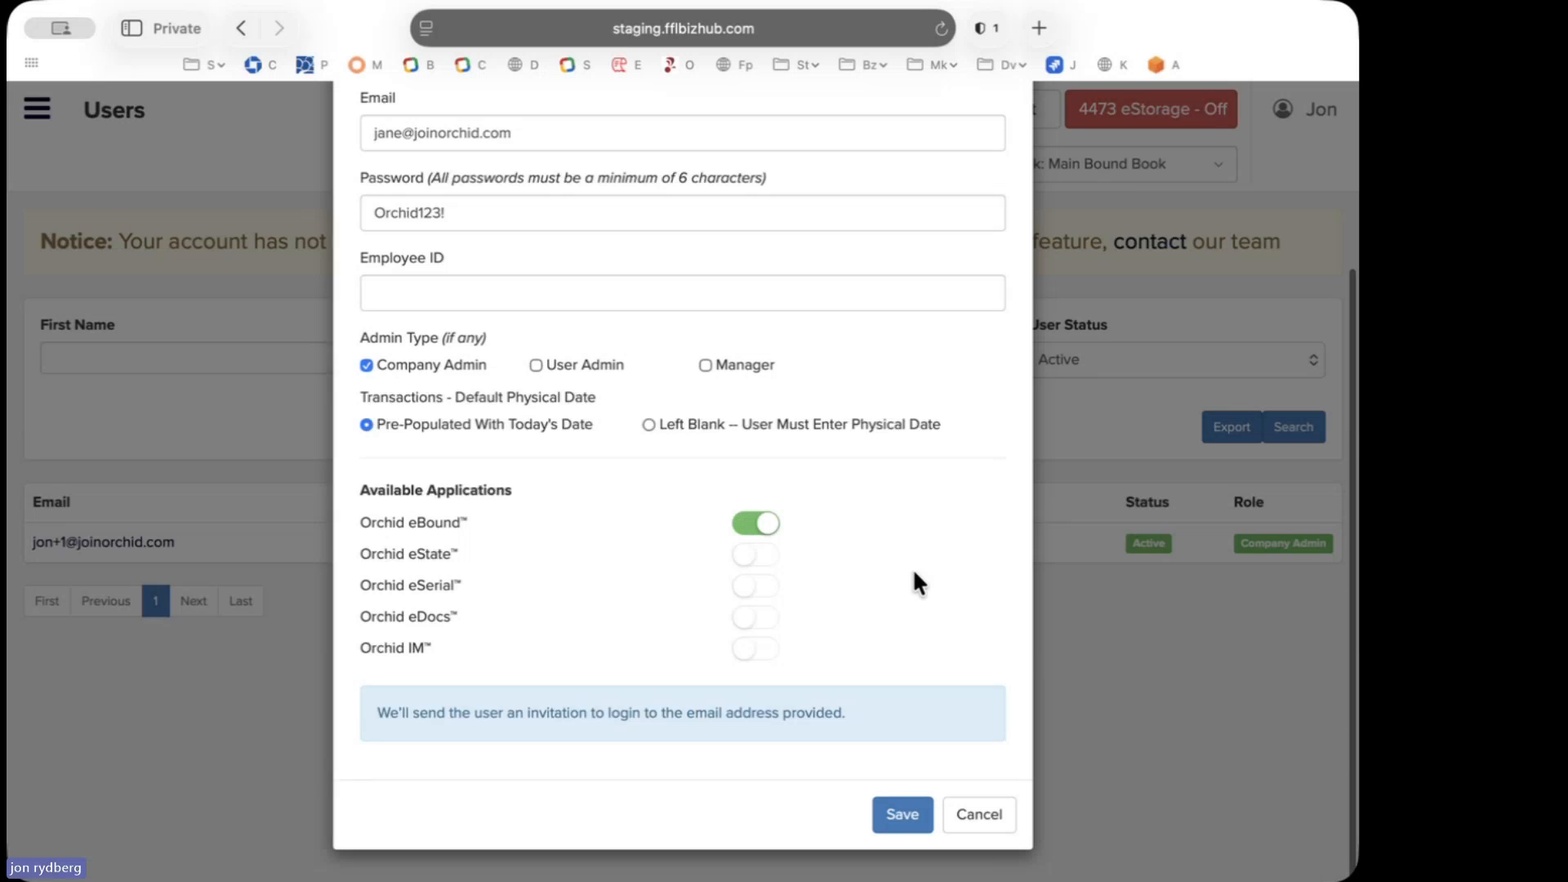
Available Applications with eBound enabled
Toggle on each application the user is licensed to use.
- Open the eBound Access tab. Click the eBound Access tab at the top of the modal to configure book-level permissions.
- Choose the Default eBound Book. From the Default eBound Book dropdown, select the book the user should land on at sign-in (e.g., 111111018E12345 - Jon's Gun Store - Book: Main Bound Book).
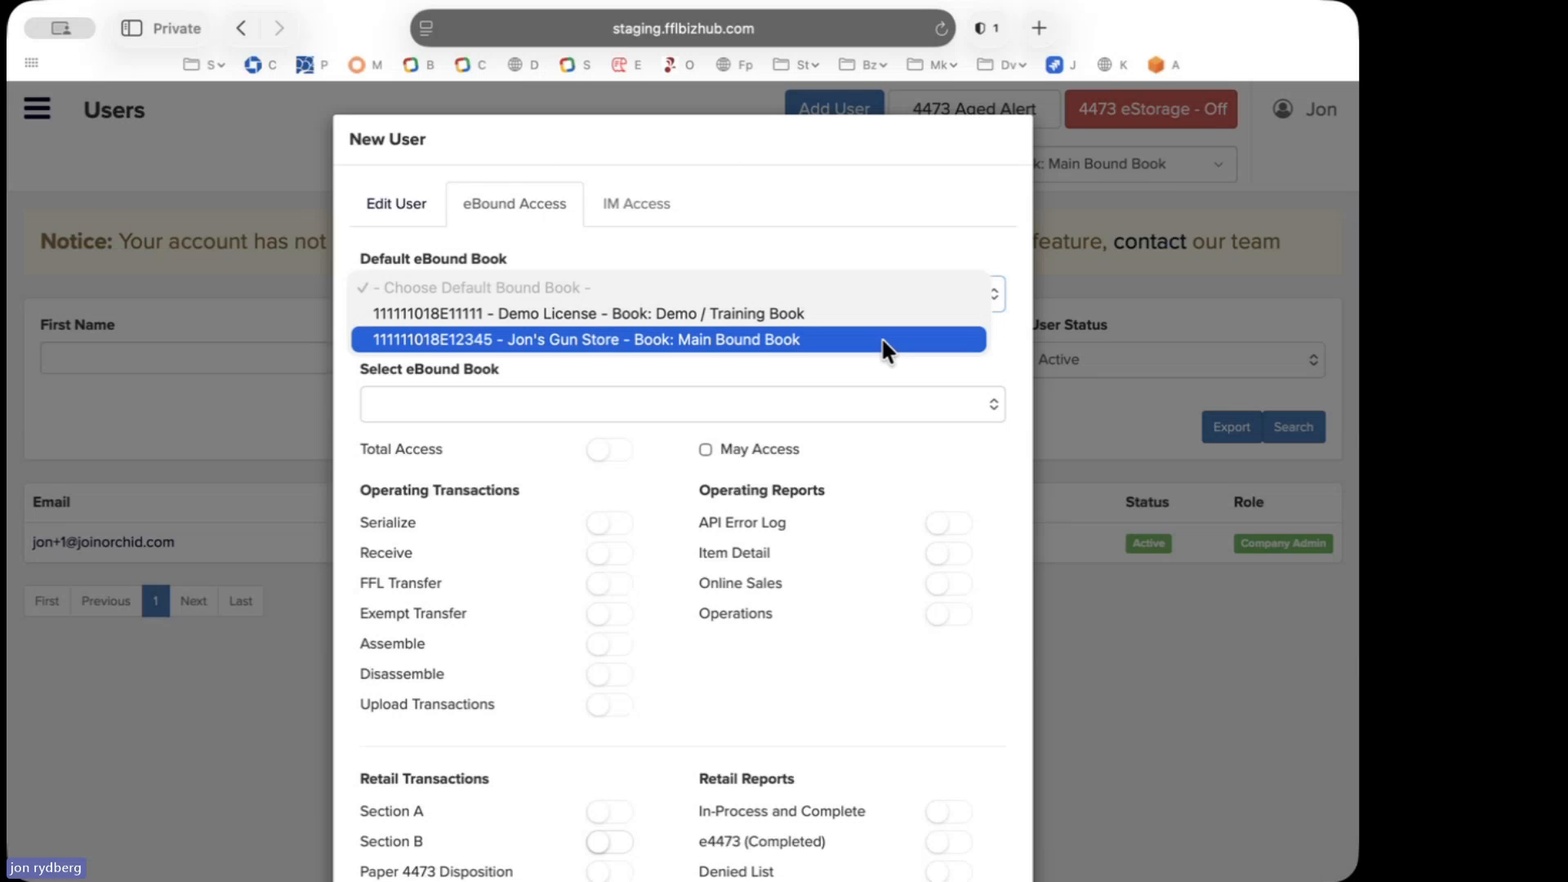
Default eBound Book selection
The default book determines which book opens first for the user.
- Optionally apply permissions to all eBound Books. Toggle Apply below permissions to all eBound Books? on if you want the same permission set to apply to every book the user can access.
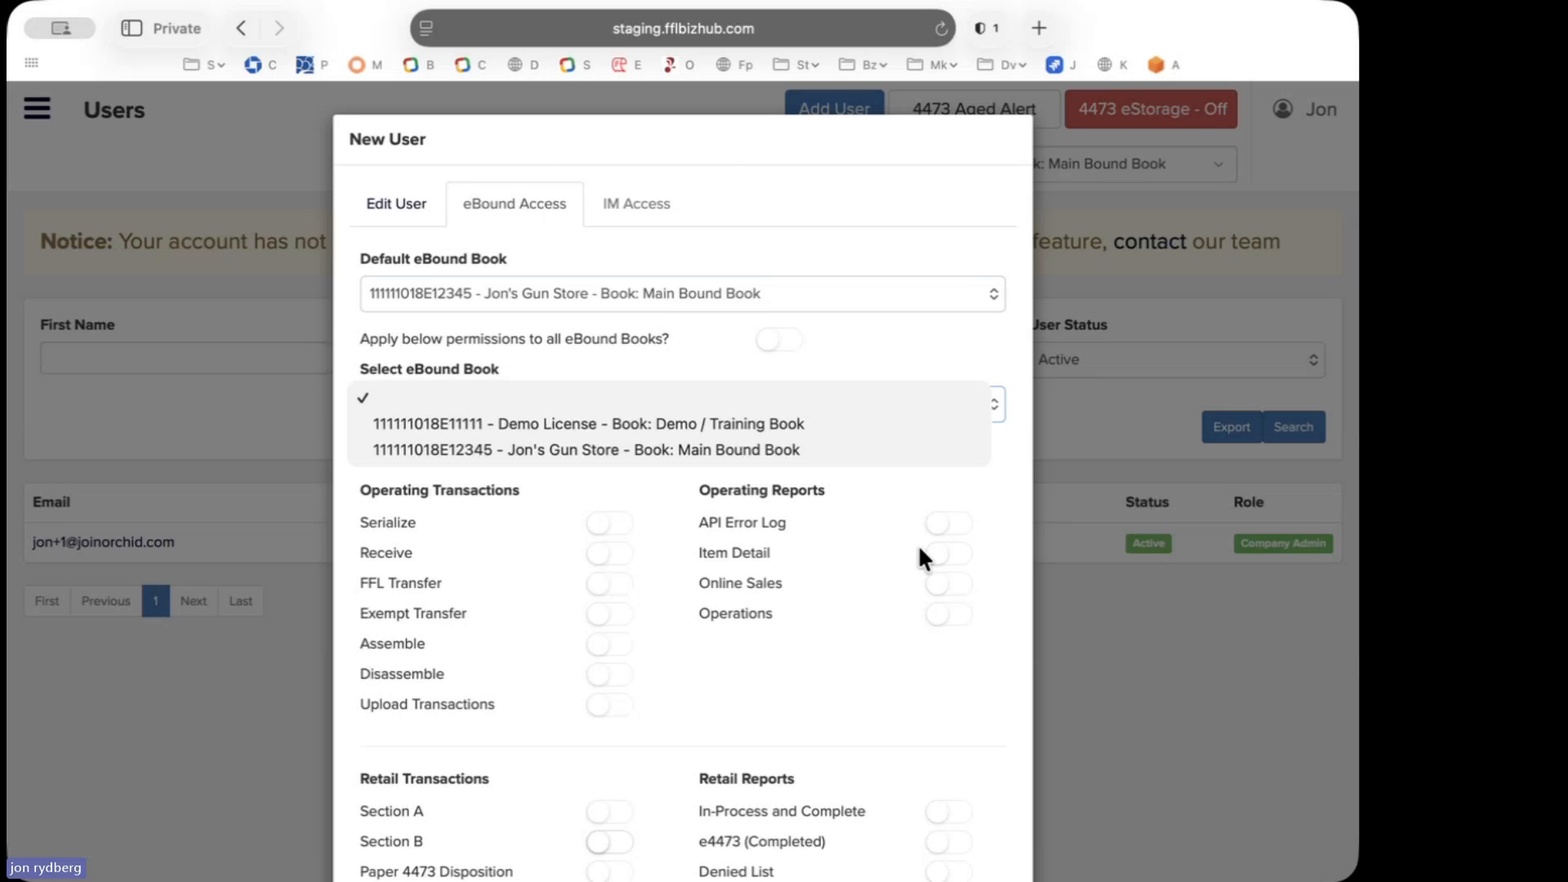
Apply permissions to all books toggle
Use this toggle to avoid configuring each book individually.
- Enable Total Access (or set granular permissions). Toggle Total Access on to grant all permissions, or leave it off and toggle individual permissions under Operating Transactions, Operating Reports, Retail Transactions, Retail Reports, Special Transactions, Special Reports, FFL Management, FFL Reports, Search Queries, and Configuration.
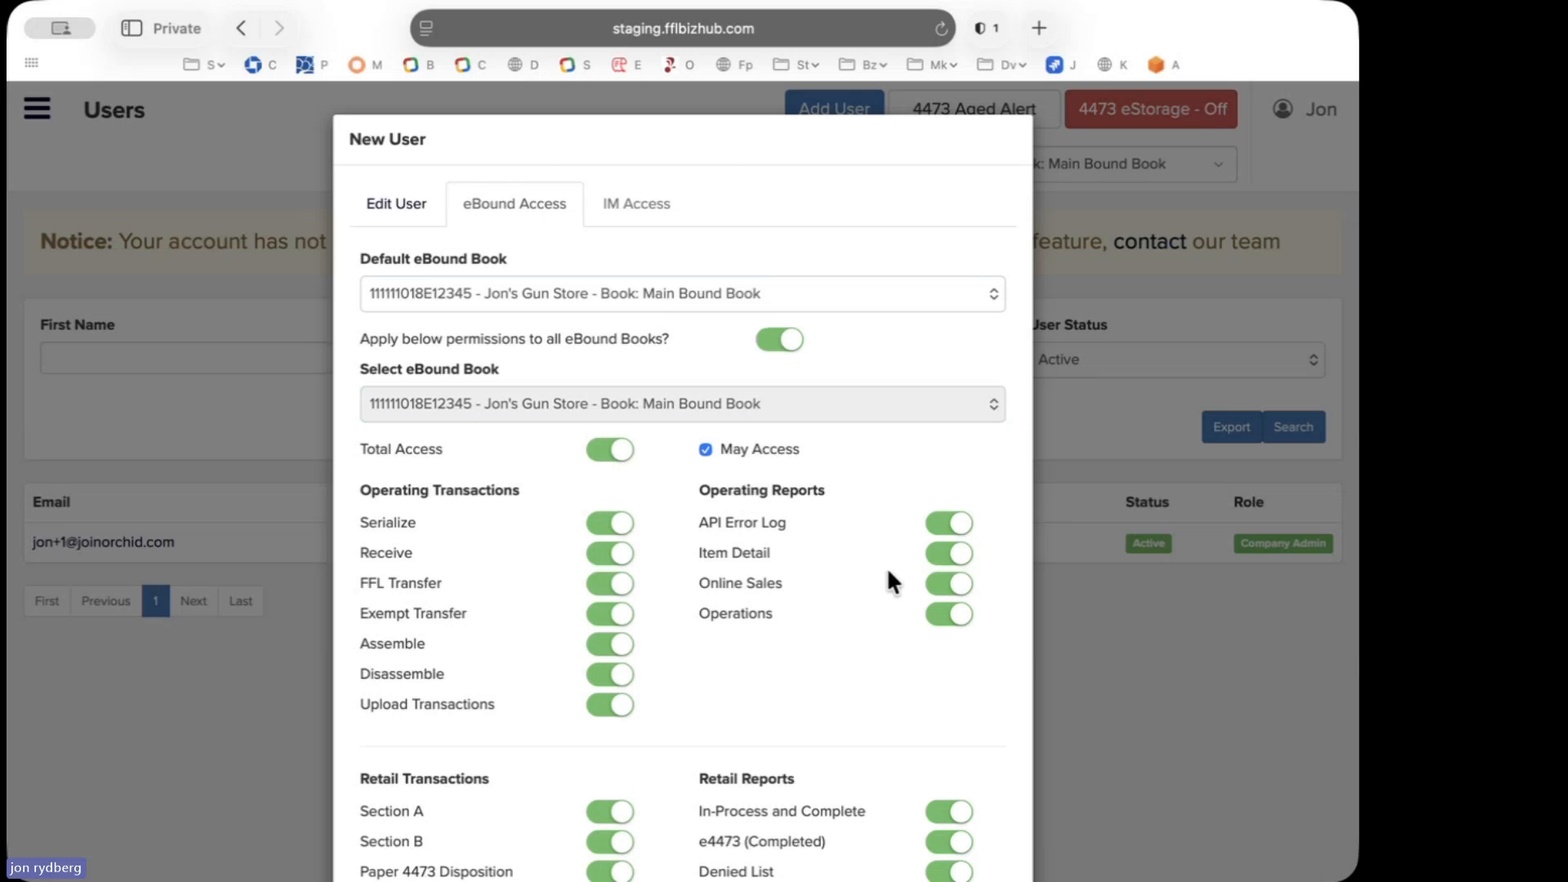
Total Access enabled with permissions
Total Access turns on every permission toggle at once.
- Save the new user. Scroll to the bottom of the modal and click Save to create the user. An invitation email is sent to the address provided.
- Confirm the user appears in the Users list. The Users page now shows both the original admin and the new user (e.g., jane@joinorchid.com) with their Status and Role.
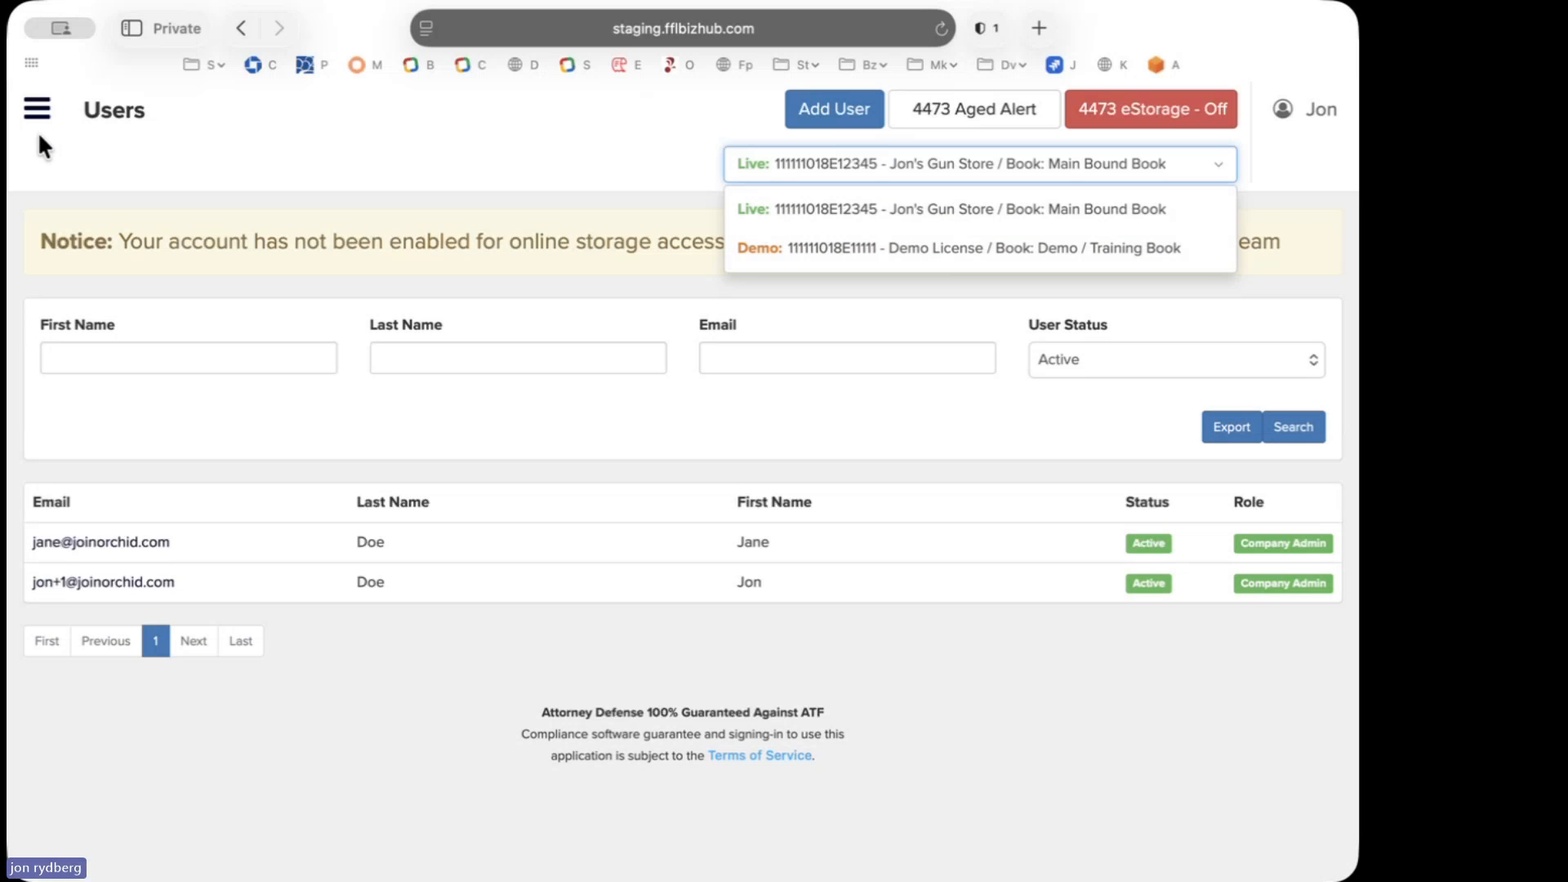
Users list with new user
The new user appears as Active with the assigned role.
- Begin a Receive transaction. Return to the main menu, confirm the Live book is selected, and from the Operating Transactions column click Receive to open the Transaction: Receive screen.
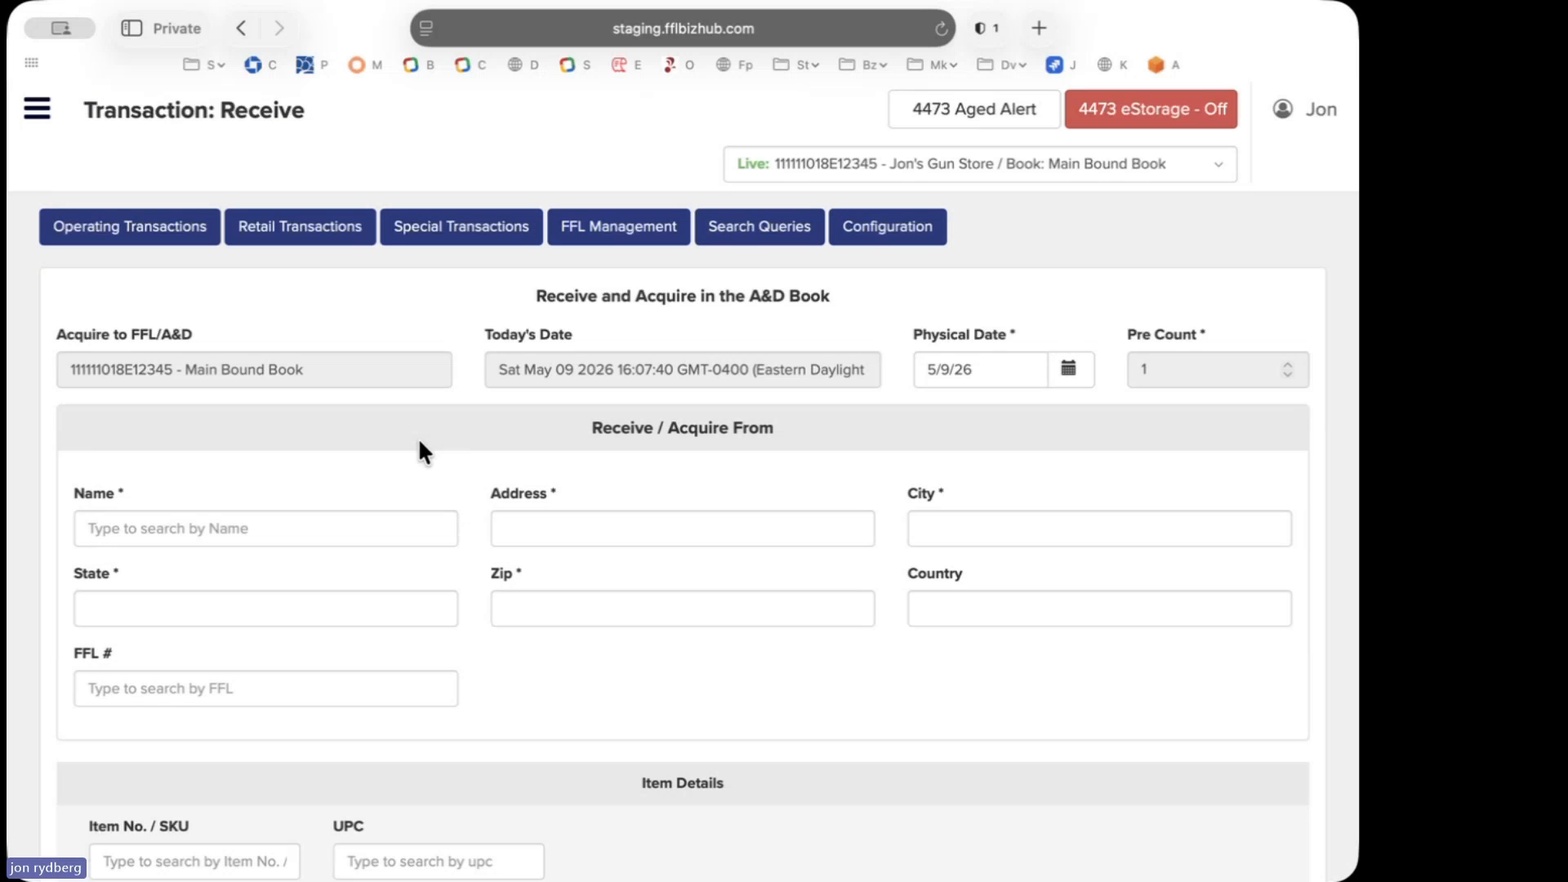
Transaction: Receive screen
Receive and Acquire records firearms entering the A&D Book.
- Confirm Acquire to FFL/A&D and dates. Verify the Acquire to FFL/A&D, Today's Date, Physical Date, and Pre Count fields are populated correctly at the top of the form.
- Enter Receive / Acquire From details. In the Name, Address, City, State, Zip, Country, and FFL # fields, type the source vendor or FFL information (use the type-ahead search to match an existing record).
- Scroll to Item Details and start typing in Manufacturer. In the Item No. / SKU, UPC, Manufacturer, Model, Sub Model, Caliber/Gauge, and Type fields, begin entering the firearm details. If the item does not exist in the Part Master, you will be prompted to add it.
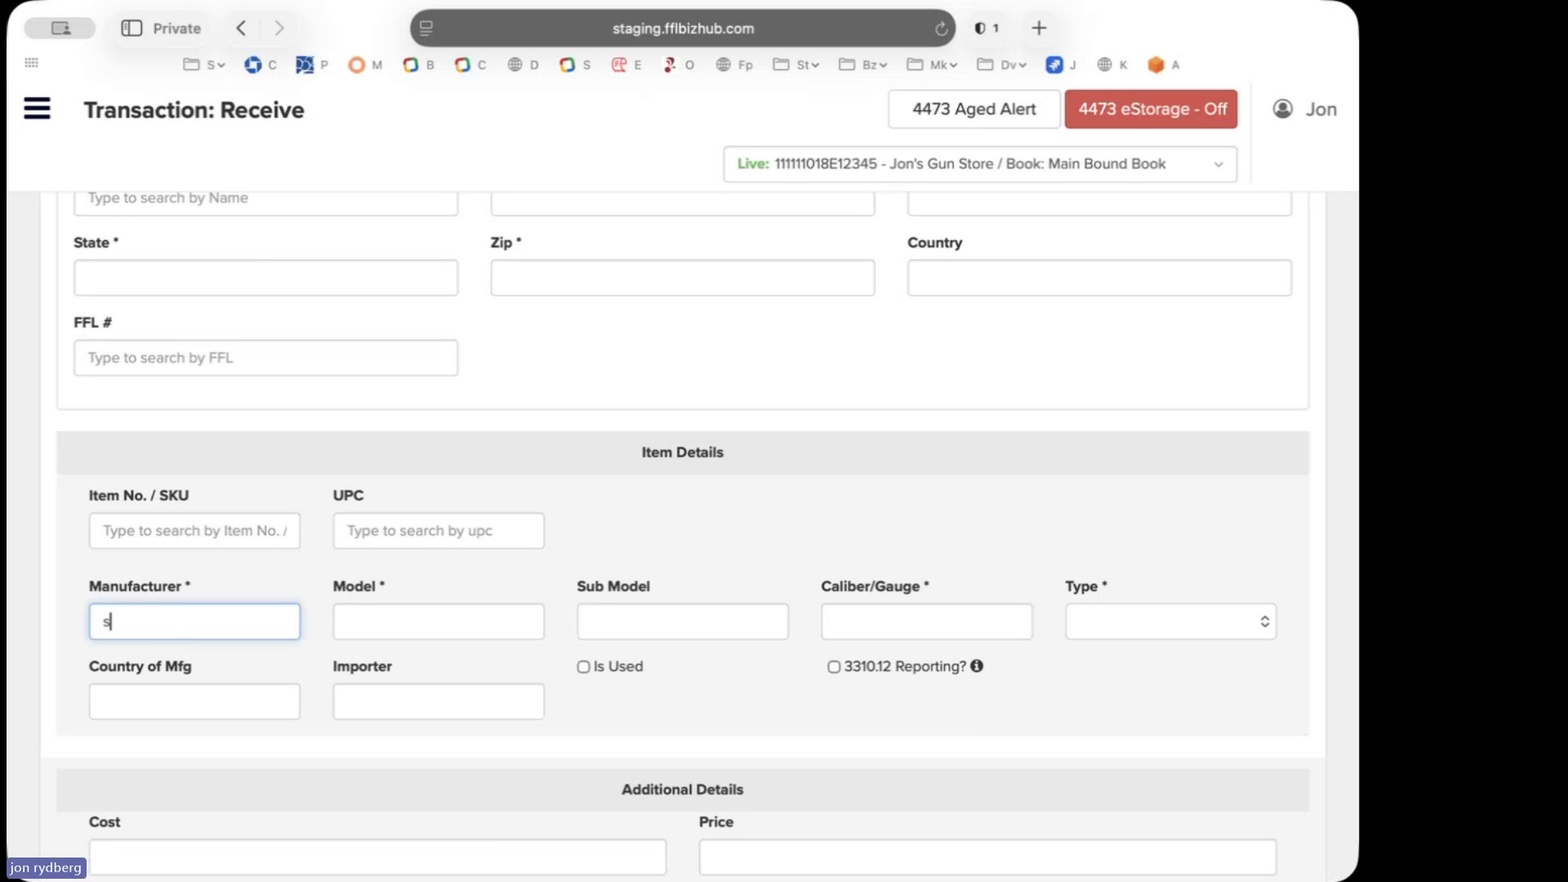
Item Details on Receive form
Item Details capture firearm-level information for the A&D entry.
Optional
If you often receive / scan the same products and barcodes, you can navigate to the Part Master (column 4 on the main screen) and save and item. Next time you perform any operating transaction (seriallize, receive, etc), you can simple scan the UPC barcode or enter the number and all firearm details will appear!)
- Add a new Part if prompted. If the item is not in the Part Master, the Add Part modal opens. Enter Item No / SKU, UPC, Importer, Manufacturer, Country of Mfg, Model, and Caliber/Gauge. Price, Cost, Length, Width, Height, and Weight are fully optional!
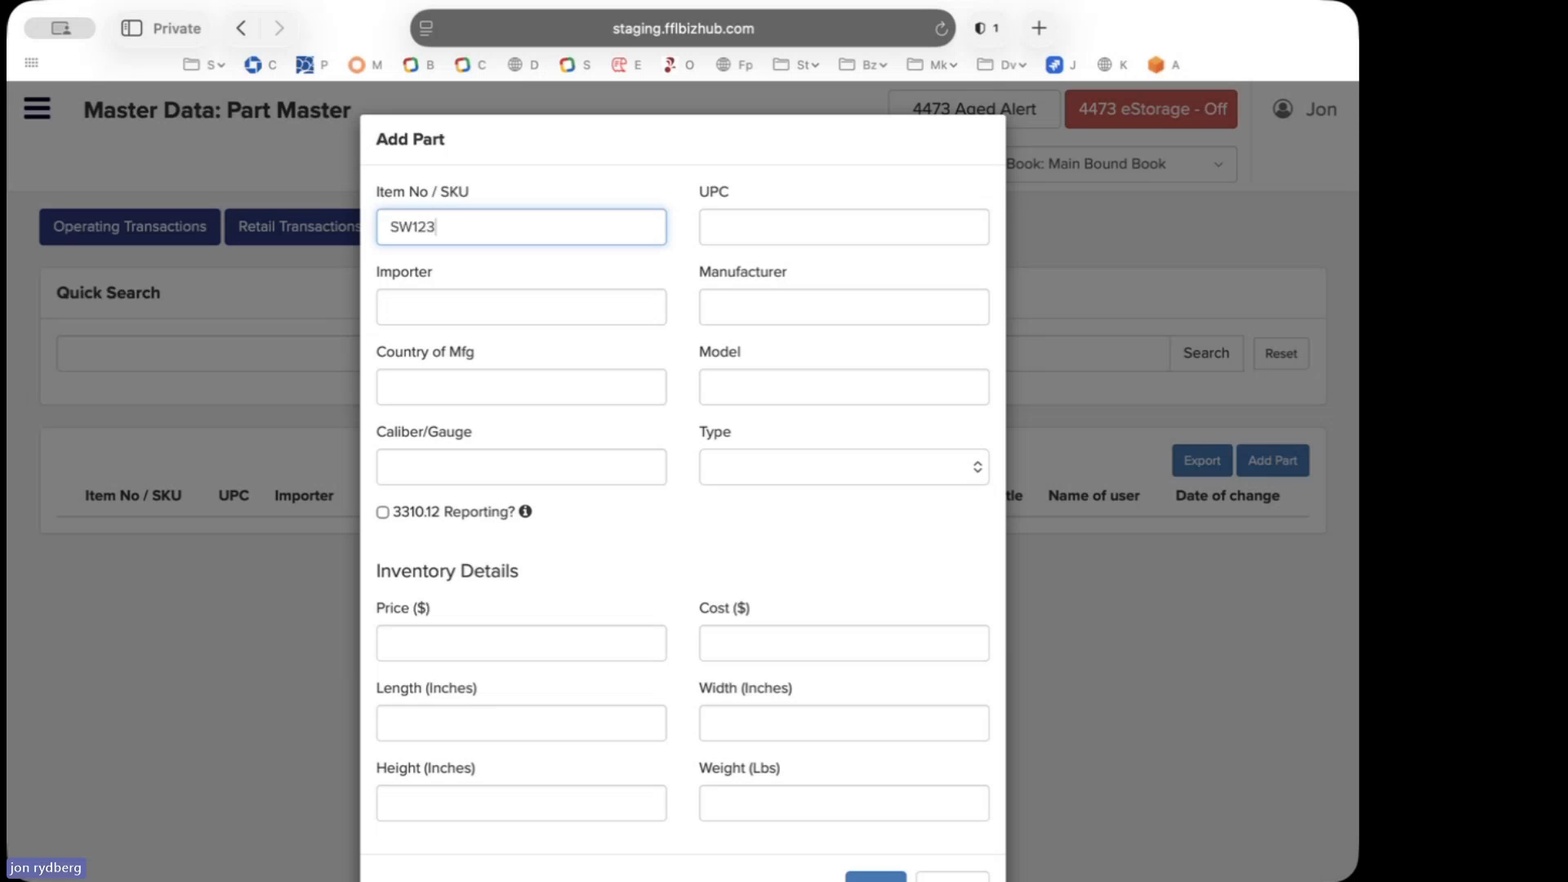
Add Part modal
Add Part registers a new SKU in the Part Master for future use.
Expected Result
You are signed in to Orchid eBound, the Live FFL and Bound Book are configured and visible in the bound book selector, at least one additional user account is created with the appropriate eBound permissions, and you are positioned in the Receive transaction screen ready to log your first acquisition.
Compliance Requirement - Daily Bound Book Backup (By Regulation)
ATF Ruling 2016-1 allows FFLs to use a cloud-based, electronic bound book. However, it also requires that you backup your bound book to a local computer on a daily basis. At the bottom of the 5th column on the main menu, you'll find a link for a Bound Book Backup. This process takes 5 minutes to setup and will automatically backup your book every day, without your involvement!